

When it comes to the advanced accounting features and tools, QuickBooks software is a bliss to have. For a decade, it has been dominating the list of the best accounting software across the globe. From handling finances to managing inventory and generating invoices, QuickBooks helps small and medium-sized businesses streamline their operations and boost efficiency. Well, there is no doubt that QuickBooks accounting software is a powerful and useful tool for businesses of all sizes. Despite that, the harsh truth is that it involves numerous technical errors and glitches that can sometimes be frustrating for users. That’s the time when the role of the QuickBooks clean install tool comes into play.
Intuit specifically designed this tool to eliminate corrupted files and settings that could be causing the error, enabling users to restart their accounting tasks with QuickBooks. The best thing about this tool is that it is easy to use, saving users time and frustration. Today, in this article, we will guide you through all the aspects related to the QuickBooks clean install tool and how to use it effectively to resolve the installation issues that you may be facing with the QuickBooks software. So, make sure to read through the instructions carefully and follow them step-by-step to ensure a successful implementation of the QuickBooks clean install tool.
What is the QuickBooks Clean Install Tool?
The QuickBooks clean install tool is a useful tool designed by Intuit to allow users to easily manage the software installation process by removing corrupted files or data that might be causing the error. This tool conducts a thorough scan of the computer to identify and resolve any issues that might be hindering the installation process. It ensures a clean slate for successful software reinstallation and clears the cache memory that occupies the system, often leading to performance issues.
The QuickBooks clean install utility tool’s operation is simple and user-friendly, making it an effective troubleshooting solution for resolving installation errors. It will help in resolving various types of errors or issues, including damaged installation files, compatibility issues, and incomplete installations.
Benefits of Running the QuickBooks Clean Install Tool
Running the QuickBooks clean install tool is not just about resolving errors. It’s about enhancing your software’s overall performance. By removing corrupted files or data that may be causing errors, the tool can significantly optimize the program’s functionality. If you’re experiencing software performance issues or frequent freezing errors, the QuickBooks Clean Install tool can be your solution. Here are some of the key benefits it offers:
- Resolves Complex Errors
The QuickBooks clean install tool specifically addresses complex installation errors beyond the scope of a simple install and uninstall process. It effectively removes all the traces of the previous installation, ensuring a fresh software restart.
- Restores Default Settings
The clean install tool helps restore QuickBooks’s default settings by deleting the old installation files and registry entries. This can be a crucial step when dealing with the software’s performance issues or troubleshooting various errors.
- Boosts Stability & Performance
The clean install tool will boost the software’s stability and performance by deleting the corrupted files and resetting the default settings. This will result in a smooth workflow and ensure a better user experience overall.
- Clears Outdated & Incompatible Files
For businesses that are upgrading from an older version of software to a newer version, running the clean install tool will help them ensure that no outdated or incompatible files are left behind, which can create potential conflicts and issues with the software.
- Reduces Troubleshooting Time
Instead of manually spending long hours troubleshooting complex issues, the QuickBooks clean install tool is an effective alternative that quickly resolves multiple errors simultaneously and streamlines the troubleshooting process.
Recent Post: QuickBooks Error PS107
Points to Ensure Before Running the QuickBooks Clean Install Tool
Before running or using the QuickBooks clean install tool, it’s important to adhere to the best practices to ensure the tool is used correctly and effectively. Below, we have highlighted the key guidelines that you can follow to secure your company data and ensure the smooth functioning of the software and the tool.
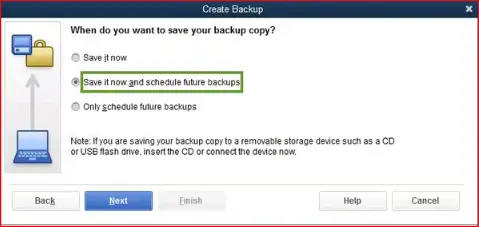
- Backup Your Company File
Before running the QuickBooks clean install tool, it’s crucial to backup your company file to prevent any accidental loss of financial information. So, in case anything goes unexpected, it will ensure that you have a safe copy of your data file that you can restore easily.
- Gather Product Details
Keep the important details handy while following the clean installation process, such as the license number, product number, and other relevant information needed to successfully reinstall the software.
- Update Windows to Latest Release
Before beginning the process, make sure to update the Windows operating system to the latest release. This will help avoid compatibility issues with the QuickBooks software and create a smooth reinstalling experience.
- Review QuickBooks Pending Processes
Ensure that no QuickBooks processes are active or running in the background before commencing with the clean installation process. Use the task manager to close all the pending processes and free up your system resources for a successful reinstallation.
How to Run the QuickBooks Clean Install Tool For Windows?
Now that you have grasped the important information about the QB install tool, it’s time to explore the detailed steps to run or use the tool to install QuickBooks cleanly on your Windows operating system.
Part 1. Uninstall QuickBooks Desktop
The very first step in the process of running the QuickBooks clean install tool is to uninstall the QuickBooks desktop software on your computer. Below mentioned are the steps that you can follow to get it done:
- Launch the Windows Run command on your PC by pressing the Windows + R keys together.
- In the search bar, type Control Panel and then hit the Enter key on your keyboard.
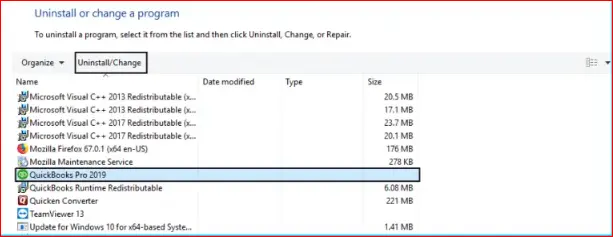
- Move to the Programs and Features section and select the Uninstall a Program option.
- As the list of installed programs appears on the screen, right-click on the QuickBooks Desktop application and select the Uninstall option.
- Keep following the on-screen instructions to uninstall the QB software from your workstation.
Part 2. Run the QuickBooks Clean Install Tool
Once you successfully uninstall the QuickBooks software from your computer, the next step in the process is to run the clean install tool. Let’s take a look at the series of steps that you can follow to do so:
- Click here to download the QuickBooks Tool Hub on your computer.
- Open the downloaded file, i.e., QuickBooksToolHub.exe, and follow the on-screen instructions to install the tool.
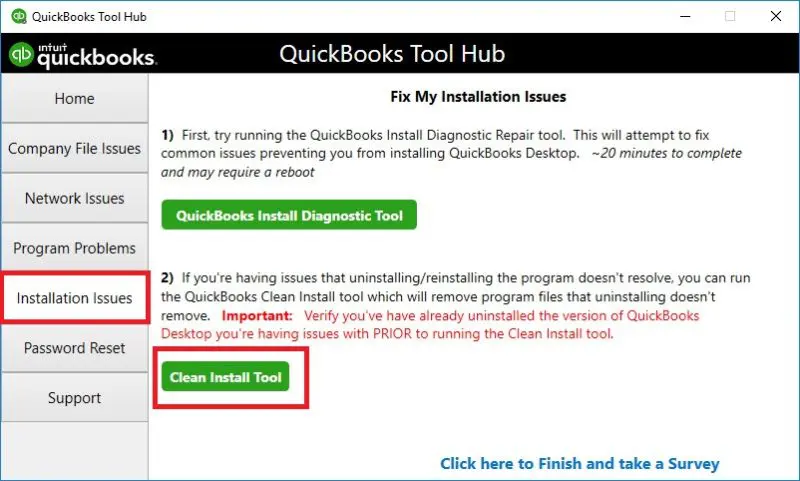
- Now, run the tool hub on your system and navigate to the Installation Issues section.
- Following that, click on the Clean Install Tool option.
- Select the QuickBooks desktop software version you previously installed on your computer.
- Click on the Continue option, and a message stating, “Please install your copy of QuickBooks to the default location” will appear on the screen.
- Provide your consent by clicking on the OK option.
At this stage, if you are unable to access your QuickBooks files due to renaming, then execute the steps mentioned below:
- Run the Windows Taskbar and head forward to the Task Manager.
- Select the Processes tab option.
- Then, select the Exe, QBDBMgrn.exe, qbw32.exe, and QBCFMonitorService.exe processes and click the End option.
- If a warning message appears on the screen, click the OK option.
Part 3. Reinstall the QuickBooks Desktop Software
This step requires users to reinstall the QuickBooks software on their computers. Before you begin this procedure, keep your product details, like the license number or product key, handy. This will ensure a smooth reinstallation process without any interruptions.
- Insert the CD of QuickBooks desktop and adhere to the on-screen instructions.
- The software installation process will prompt you to enter your product and license number.
- Provide the requested information, and then click on the Next option.
- Head forward to the type of installation section and click on the Next and then Install option.
- By the end of the above-listed steps, you will successfully be able to run the QuickBooks software without any issues or interruptions.
Also Read : QuickBooks Error Code 6154
Manually Rename the QuickBooks Desktop Installation Files
As a user, you must note that the QuickBooks clean install tool is incompatible with the QuickBooks 2020 version. In that case, you must manually rename the installation files before proceeding with the installation process.
- First, open File Explorer on your PC by pressing the Win + E keys together.
- Then, move on to the folder containing the company files.
- C:\ProgramData\Intuit\QuickBooks (year)
- C:\Users\(current user)\ AppData\Local\Intuit\QuickBooks (year)
- C:\Program Files\Intuit\QuickBooks (year)
- 64-bit version: C:\Program Files (x86)\Intuit\ QuickBooks
- Now, right-click on the folder and choose the rename option.
- After that, add .old at the end of the file name. This will disallow the QuickBooks desktop to recognize the existing installation files after reinstallation.
- At last, reinstall the QuickBooks software on your workstation.
While renaming the files, if you encounter an error message stating, “Access denied while renaming the folder,” then you have to carry out the steps mentioned below:
- To open the task manager on your computer, press the Ctrl + Shift + Esc keys together.
- Head forward to the Processes tab, and then click on the Name Column header to order the list accordingly.
- Now, search there for the following QuickBooks-related processes, i.e., Qbw32.exe, QBDBMgrN.exe, QBDBMgr.exe, and QBCFMonitorService.exe.

- Choose each process one by one and click on the End Process option.
- Following that, if you encounter a warning message stating, “Terminating a process can cause undesired results,” then click on the Yes option.
Conclusion
We hope that carrying out the steps listed above will help you get the most out of the QuickBooks clean install tool for Windows. You can effectively uninstall and reinstall the QuickBooks desktop software on your Windows PC by following this procedure. However, if you still have any queries related to the clean install tool, then we recommend you get in touch with the QuickBooks enterprise support team for further assistance. They will provide you with the necessary guidance and support to ensure a successful implementation of the QuickBooks clean install tool.
Selina Conner is a technical professional who works with important technological areas focused on data recovery and associated technologies. She enjoys writing about diverse technology and data recovery topics on a daily basis.